
When to Introduce a Crash Pad for Bouldering

Introduce a crash pad before a child starts bouldering, so there is a padded landing area beneath the route from the outset. Knowing when to introduce a crash pad depends less on age than on the activity: use one when a child is climbing and could fall, especially onto hard or uneven ground. A pad can cushion a landing, but it does not make unsafe heights safe or replace close adult supervision.
It is natural to want a child’s first climbing experiences to feel exciting and carefully managed. A crash pad is a cushioning mat placed beneath the likely fall area; its position and the surrounding ground matter just as much as the pad itself. This guide explains what a crash pad does, when and where to use one, what to consider when choosing a first pad, and how an adult can set it up for supervised use. It also covers when to stop and reassess, so enthusiasm for climbing goes hand in hand with sensible precautions.
Key Takeaways
- Choose a first pad by weighing its cushioning, size and portability against where and how it will be used.
- Position the pad beneath the likely fall area on clear, flat ground, and arrange extra mats to cover gaps when needed.
- Account for landing terrain, climbing height and conditions such as cold weather when judging the protection a setup can provide.
- Keep an adult supervising active play, inspect the pad before use and stop if a child becomes tired, upset or unsafe.
Choosing a first crash pad
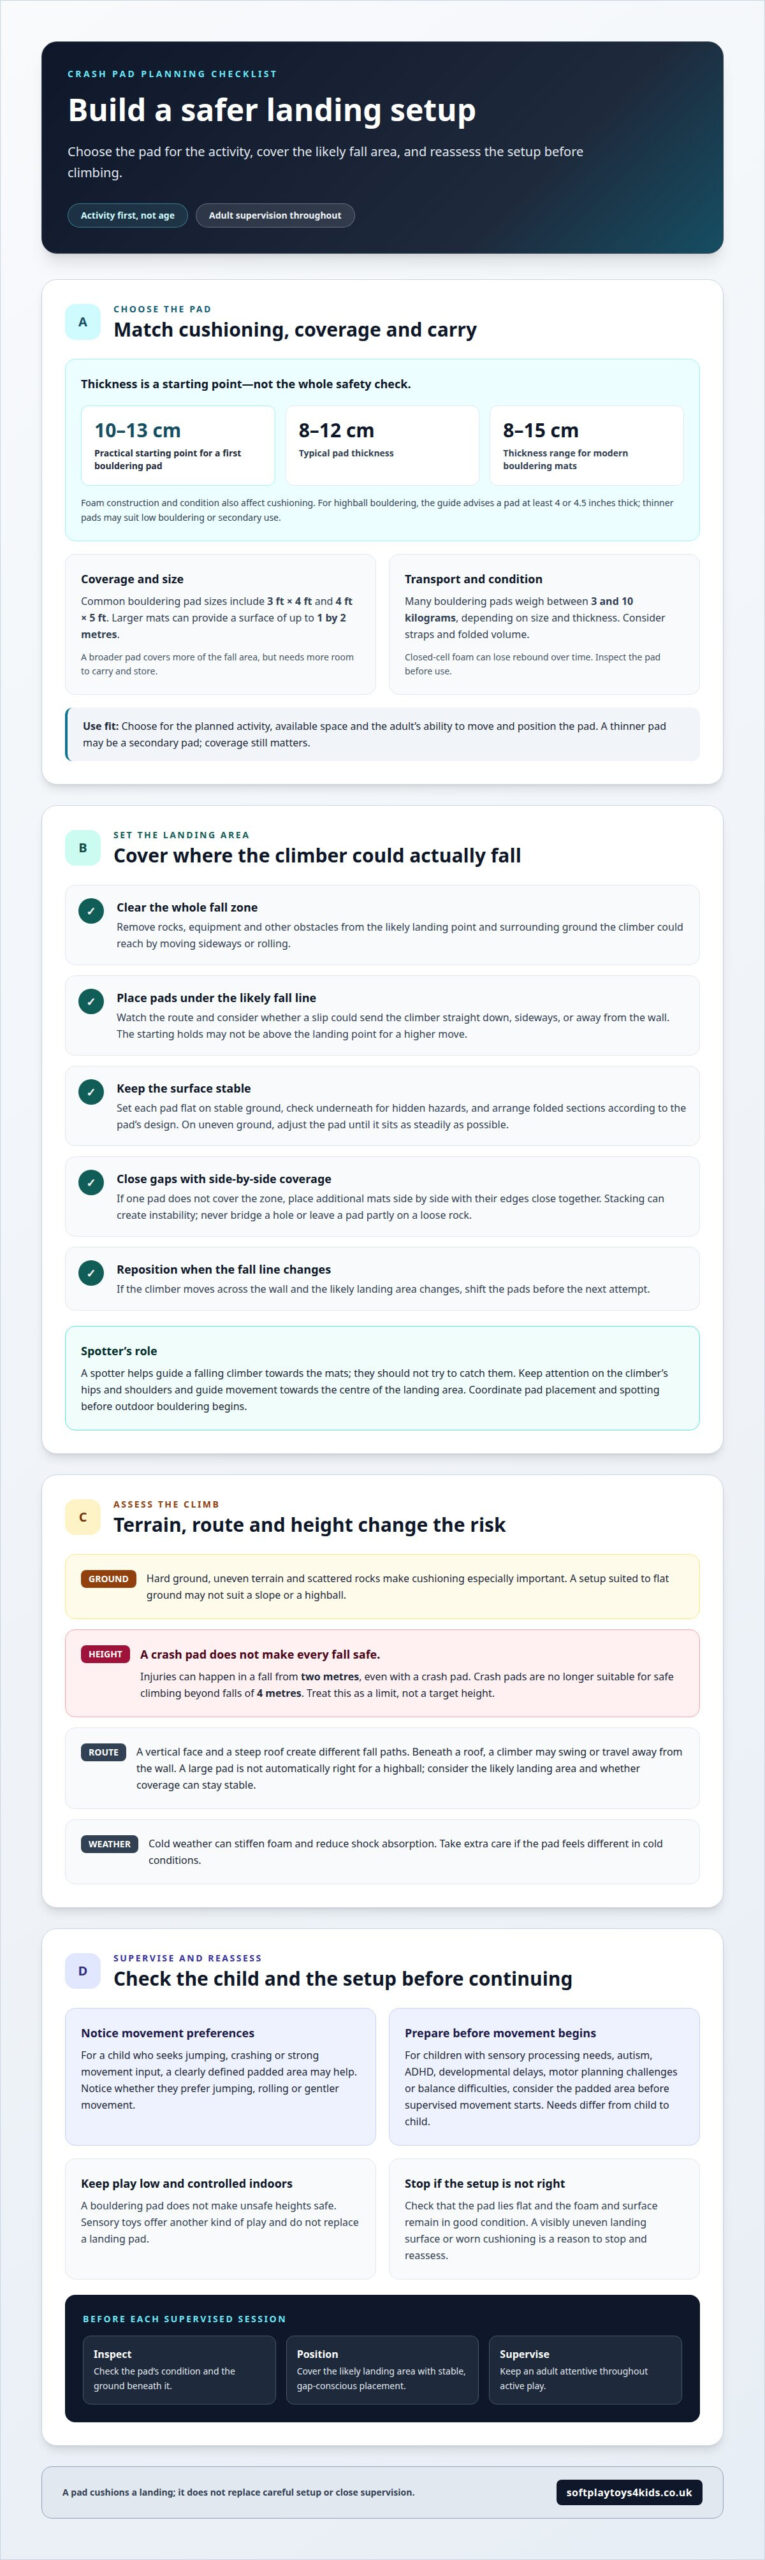
Deciding when to introduce a crash pad starts with the activity and landing area, not the child’s age. For bouldering, the pad cushions the surface beneath a climber’s likely fall zone. A first bouldering pad around 10-13 cm thick is a practical starting point; typical pads are around 8-12 cm thick. Foam construction and condition matter too, so thickness alone doesn’t determine how well a pad cushions impact.
Match sensory tools to the child’s observed needs. A child who seeks jumping, crashing or strong movement input may benefit from a clearly defined padded area, with an adult supervising each session. For children with sensory processing needs, autism, ADHD, developmental delays, motor planning challenges or balance difficulties, these interests can help clarify when to introduce a crash pad: before supervised movement begins. Needs differ, so notice whether the child prefers jumping, rolling or gentler movement. Sensory toys offer another kind of play and do not replace a landing pad.
Size affects both coverage and practical handling. Bouldering pads commonly come in 3 ft × 4 ft or 4 ft × 5 ft sizes, while larger mats can provide a surface of up to 1 by 2 metres. A broader pad covers more of the fall area, but takes more room to carry and store. Many bouldering pads weigh between 3 and 10 kilograms, depending on size and thickness.
- Check the carry: Consider the straps and folded volume if an adult must transport the pad between locations.
- Check the foam: Closed-cell foam can lose rebound over time; inspect the pad’s condition before use.
- Check the use: A thinner pad may suit low bouldering or work as a secondary pad, while the landing area still needs careful coverage.
Choose a pad that suits the planned activity, available space and adult’s ability to move it. For supervised indoor movement, keep the activity low and controlled. A bouldering pad does not make unsafe heights safe.
Modern bouldering mats can be 8-15 centimetres thick; for highball bouldering, the guide advises a crash pad at least 4 or 4.5 inches thick. It recommends a thinner pad for low boulders or secondary use.
For solo bouldering, two full-size pads and one thin slider are a practical sweet spot.
Positioning a pad beneath the likely fall line
Before a climbing session, clear the ground and place the bouldering pad beneath the climber’s likely landing area. On uneven outdoor ground, adjust its position until the surface sits as steadily as possible.
Assessing Fall Zones and Trajectories
A fall zone is the ground a climber could reach while falling from a particular move. Watch the route and consider whether a slip might send the climber straight down or away from the wall. Place the pad beneath the most hazardous move, then adjust it for likely sideways movement. A pad under the starting holds may not cover the landing point after a higher move.
Fall-Zone Area
The fall zone includes the likely landing point and the surrounding ground the climber could hit after moving sideways or rolling. Clear the entire area of rocks, equipment and other obstacles before positioning mats. If one pad does not cover the zone, place additional mats side by side to widen the landing surface. Keep their edges close together, since gaps can expose the ground during a fall.
Set each pad flat on stable ground, arranging its material and folded sections according to the pad’s design. Check underneath for hidden hazards and ensure the landing zone extends beyond the climber’s direct line. Stacking pads can create instability, especially on uneven terrain, so side-by-side coverage is usually better. Never bridge a hole with a pad or leave it partly on a loose rock.
A spotter helps guide a falling climber towards the mats; they should not try to catch them. Keep attention on the climber’s hips and shoulders, and guide their movement towards the centre of the landing area. For outdoor bouldering, coordinate pad placement and spotting before the climber starts. If the fall line changes as they move across the wall, shift the pads before the next attempt.
In indoor climbing spaces, consider hazards beyond the landing zone too. Protective column padding can help address exposed columns near an activity area.
Factors affecting crash-pad needs
Start by assessing the landing surface. Hard ground, uneven terrain and scattered rocks make cushioning especially important, but a pad’s protection depends on more than its thickness. A model that works on a flat landing may not suit sloping ground or a highball. Assess the terrain and likely fall before deciding whether the setup suits the climb.
Height matters, but no pad makes every fall safe. Injuries can happen in a fall from two metres, even when a crash pad is in place. Crash pads are no longer suitable for safe climbing beyond falls of 4 metres. Treat that as a clear limit, not a target height, and don’t use a pad to justify climbing higher.
The climbing style affects what the landing setup needs to handle. A vertical face and a steep roof create different fall paths; beneath a roof, a climber may swing or travel away from the wall. A large pad is not automatically right for a highball. Consider the pad and terrain together, and whether the pad can cover the likely landing area without unstable gaps.
Conditions can affect a pad’s performance. Cold weather can stiffen foam and reduce shock absorption, so take extra care if the setup feels different in cold conditions. Before climbing, check that the pad lies flat and that its foam and surface remain in good condition. A visibly uneven landing surface or worn cushioning is a reason to stop and reassess.
Transport also matters when choosing a pad. A heavier pad or bulky folded shape can be harder to carry to an outdoor bouldering spot, especially over rough ground. Balance the coverage needed for the route with what the adult can move and position reliably. Add pads only when they improve the landing area without making the surface less stable.
Finally, match the plan to the climber and setting. Keep attempts low and controlled, with an adult supervising throughout. If the height, terrain or landing position changes, pause and reassess the setup before the next climb.
Protection from repeated falls
During bouldering, repeated falls can expose heels, ankles, shins and knees to impact. A crash pad cushions the landing area, but it cannot guarantee injury prevention or replace adult supervision. Indoor climbing walls use pads in bouldering areas for this reason. Keep attempts controlled and low, and make sure the child knows where to land.
Practise the landing before a child repeats a climbing move. On a low, supervised attempt, encourage landing on the feet with bent knees, then rolling backwards to spread the impact when appropriate. An adult can first test the setup by stepping onto the pad and hopping off from a low height. If the pad bottoms out or feels uneven, stop and reassess it before another attempt.
Repeated movement can also include jumping, rolling, crawling or a simple obstacle course. Keep each activity within the pad’s coverage, with an adult close by throughout. End the session if the child becomes tired, dizzy, upset or unsafe. A crash pad is not permission to climb or jump from unsafe heights.
- Before play: Inspect the pad and its cover for damage, then follow the product’s care instructions.
- During play: Keep the landing surface clear and watch for movement that carries the child beyond its edges.
- After a change: Reposition the pad if the activity or direction of movement changes.
Climbing practice should build control, not encourage bigger falls. Start with gentle, low movements, and pause whenever the child’s landing becomes unpredictable. A crash pad is one part of a supervised setup, alongside clear boundaries and an adult ready to stop the activity.
For indoor movement areas with exposed columns nearby, explore column padding as a separate protective measure.
Moderately firm foam can help cushion a fall, but it does not guarantee ankle protection or suitability for big falls from height. Injuries are possible in a bouldering fall from two metres, even when using a crash pad.
Repeated falls while projecting bouldering problems can injure climbers’ heels, ankles, shins and knees. Beyond climbing practice, a crash pad can also be used for jumping, rolling, gentle backward falls, crawling, obstacle-course activities or resting after movement, provided an adult supervises.
SoftplayToys4kids
SoftplayToys4kids can help when you’re planning a child-friendly play area alongside supervised climbing or movement. Sensory Toys can complement activities by offering other ways to explore touch, sound and play, while Lamp Post Protectors address a separate impact concern around exposed posts. These products don’t replace a bouldering crash pad, careful fall-zone setup or adult supervision.
Consider your space and the activities you want to support. For example, a home playroom may call for different equipment from an outdoor area with exposed posts. Choose equipment for its intended use, and keep climbing activities low, controlled and supervised. For advice about SoftplayToys4kids products that may suit your wider play environment, contact SoftplayToys4kids.
Make the next play decision with confidence
Deciding when to introduce a crash pad is part of creating a thoughtful movement space, not a reason to rush a child towards bigger climbs. Let the child’s interests and comfort guide the next activity, and keep an adult involved as play develops. A climbing setup and a wider play environment serve different purposes, so choose equipment to match each activity rather than treating every soft surface as interchangeable.
For other kinds of children’s play, SoftplayToys4kids offers Soft Play Ball Pits, Soft Play Mats and Sensory Toys. These can help you plan a play area around varied movement and sensory experiences, alongside appropriate supervision. If you’re considering equipment for your child’s play space, contact SoftplayToys4kids to discuss your needs. A considered setup can help make room for joyful, confident play.
Frequently Asked Questions
What is a crash pad?
A crash pad is a portable, foam-filled mat placed beneath a bouldering route to cushion the landing area. Bouldering pads commonly contain two or three layers of polyurethane foam, and their construction affects how they absorb impact. Many fold for transport between climbing spots. For example, an adult can carry a folded pad outdoors, then open and position it before a supervised climbing session.
Leave a Reply